Have you seen Elementor?
Our flagship product, Layers has been acquired by the team at Elementor.
With a powerful, fast page builder, Elementor is the best way to get your site online with as little effort as possible.

From your WordPress Dashboard, click on If you are already on the Site Layout tab, click the General tab
Custom Logo
Favicon
 This option allows you to upload a favicon, which is the tiny icon displayed in the browser address bar when visitors view your site. The dimensions should be 16 x 16 pixels. Click on Browse to upload an image file from your hard-drive, or enter the URL of your image file if it is hosted elsewhere.
You can upload as many logos as you like and then simply switch to the one you prefer by clicking on the thumbnail. For best results, your favicon should be a .gif or 24-bit .png. You should not use a .jpg as it will probably not display.
This option allows you to upload a favicon, which is the tiny icon displayed in the browser address bar when visitors view your site. The dimensions should be 16 x 16 pixels. Click on Browse to upload an image file from your hard-drive, or enter the URL of your image file if it is hosted elsewhere.
You can upload as many logos as you like and then simply switch to the one you prefer by clicking on the thumbnail. For best results, your favicon should be a .gif or 24-bit .png. You should not use a .jpg as it will probably not display.
Custom Login Logo
Click Browse to select a custom login logo, which is displayed on the WordPress admin login page. Recommended dimensions are 326px by 82pxFacebook Sharing Options
This option allows you to disable the theme's OpenGraph support if you are using a plugin that duplicates the feature and does not allow disabling it. If left on, you may set a default site image for Facebook to use if it cannot find a featured image on the page or post being shared. Your image must be at least 200px by 200px. View this article for more on Facebook OpenGraph and how it works in your theme.
Breadcrumbs
Select Disabled in this menu if you want to hide the breadcrumb bar at the top of posts. Breadcrumbs look like this and provide quick navigation back to parent pages or categories:
![]()
Post Meta & Content Display
These settings control which post meta is displayed in posts.
- Show Date: Uncheck to hide the date
- Show Author: Uncheck to hide the author link
- Show Category: Uncheck to hide the category link in posts and blog
- Show Tags: Uncheck to hide tags
- Show Social Sharing: Uncheck to hide social sharing. Note that custom social widget codes will appear regardless of this setting.
- Next/Previous Posts: enable the next and previous post links on posts
Content Length on List Pages Select a Content Length from the menu. This affects how much content is generated for the category/blog/post list pages.
- If Excerpts are selected, WordPress will auto-generate a 55 word excerpt from the post content, excluding shortcodes and images, or display your custom Excerpt.
- If Full Post Content is selected, you may use the More tag to manually set a cut-off point and full content will be displayed including images or embeds prior to the cut-off. Read More links are not shown when Full Content is enabled!
Page Meta
These settings control which post meta is displayed in default or full-width pages.
- Show Date: check to show the date
- Show Author: check to show the author link
- Show Social Sharing: check to show social sharing. Note that custom social widget codes will appear regardless of this setting.
eCommerce Category Image
Select Enabled to display the category image on your shop category pages, or Disabled to hide it. This setting does not affect the Product Category widget. For best results, use Category images at least 660px wide if enabled.
Custom Styling
This field allows you to enter any Custom CSS overrides used to customize the theme beyond simple color changes. Add any styles from the style.css or create your own here. Content in this field is saved to the database, so you won't lose changes if reinstalling the theme.
[TO – Socialcode]
Custom RSS URL
Enter the URL to your custom feed, such as Feedburner if you have one. If left blank, the default WordPress RSS URLs will be used.
Site Layout Tab
Other than your home page layout, you can setup the sidebar and main site layout here.
Site Layout
Choose between a boxed or full-width layout. Like the thumbnails depict, “boxed” means the initial width of the site is set to a specific width and the background shows on both sides and is the layout used in our demo.
Home Page Layout
Click the thumbnail corresponding to the home layout you desire if not already done. Detailed coverage of the Home Layout options are in the previous article Setup Your Homepage
Sidebar Layout
Choose which side you would like your site sidebar to display on posts and pages. Alternatively hide it completely on all pages.
Shop Sidebar Layout
Choose which side you would like your site sidebar to display on the shop and products. Alternatively hide it completely for a full-width layout.
Header
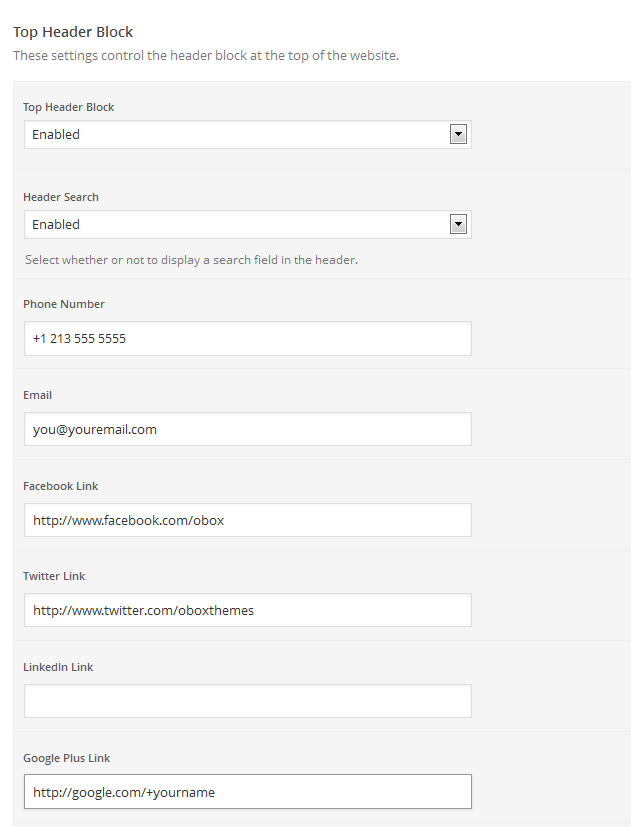
Top Header Block
These settings control the content of the top bar containing the search, social and help menu, also called the Contact Header
- Select whether to Enable or Disable the Top Header Block. If disabled, the rest of the settings for this section are ignored.
- Choose whether to Enable or Disable the Header Search icon in the top bar. This icon will appear on the far left and expand the search field when clicked.
- Enter a phone number and/or email to give customers a quick way to contact your customer service. For best results with mobile devices, use the official phone number format.
- Enter full URLs to your social profiles. Any fields left blank will not be shown. See below for examples of how these urls should be formatted.
- Click Save Changes
eCommerce
Page Title Description
Select Enabled to display a short paragraph of text below the title across the top of pages. This description is taken either from the Page’s Excerpt field, or will be generated from the first 55 words of the page content where available. The Page Title Description does not show on dynamically generated pages such as category archives.
Navigation
Menu Style Your theme has two Primary Menu styles. By default, the Compact menu is enabled. To set a standard horizontal link menu, choose Expanded. This menu will appear on desktop and tablet views.
Menu Label You may also set a custom label for the menu button when in compact mode if desired. For no label, remove the default label (Menu) and Save Changes
Footer
Site Wide Call to Action
These settings control the site-wide-call-to-action at the bottom of the website, which is a ribbon containing a short bit of promo text and a button.
- Check Show Site Wide Call to Action to enable it
- Enter a short but of text into the Text field.
- Enter the word you want to use on the button in the Button Text field. If this is left blank, default text will be used.
- Enter the URL to go to in the Button Link field. If this is left blank, the button will not appear. For best results, link to a page on your own site using the full page url to keep visitors on your site.
The following example demonstrates how this can be used to promote a sale with coupon code: 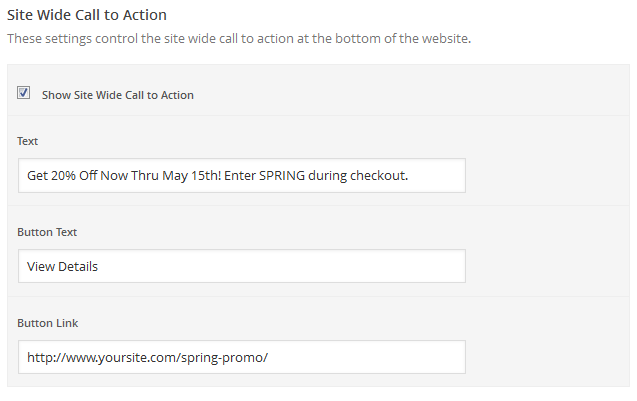
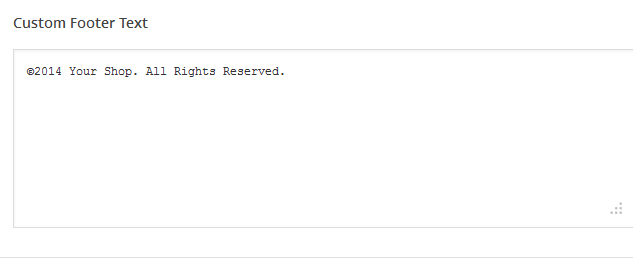
Custom Footer Text
This section gives you some control over the copyright area of the footer. You can put simple HTML in this field such as links or small images, or just change the copyright to your own business name.
Hide Back to Top
Set this to Yes if you don’t want the back to top button to show. In most cases, this should be left enabled ( No) unless it conflicts with a plugin’s visual placement.
Hide Obox Logo
All of our themes come with an Obox credit at the bottom right of the footer. To switch this off, simply uncheck the box (although you get extra awesome points for leaving it on!)
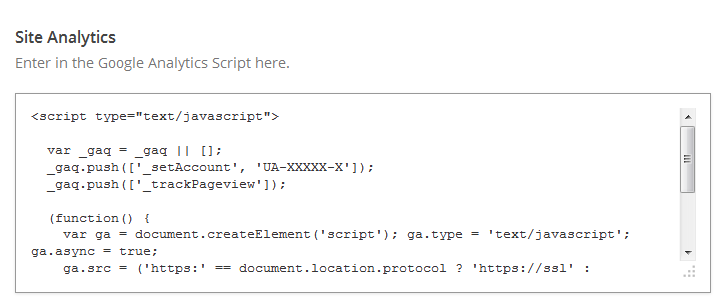
Site Analytics
If you would like a quick and painless way to implement Google Analytics, paste your preferred tracking code into this text area. Your code will then be inserted into the footer of the theme, which is best for performance reasons. Learn more about Google Analytics here.