Have you seen Elementor?
Our flagship product, Layers has been acquired by the team at Elementor.
With a powerful, fast page builder, Elementor is the best way to get your site online with as little effort as possible.

This theme has been retired and is no longer being actively developed. Don’t worry, it should still work for some time and will continue to receive critical updates for up to one year from your original purchase date. Learn More Here
Your theme is designed to display featured products via a variety of widgets on your homepage, and also supports a simple eCommerce shop via your Custom Product Post Type. You will need at least three products to test all aspects of the theme.
The Product post type allows you to list and categorize your products.
Add Products
- Go to →
- Add the product name in the Title field. Try to keep this short and sweet.
- Enter any copy or product information into the post editor. For best results, keep this brief and do not insert images here.
- Click Browse in the Image field of the Done Deal Options panel below the post editor to upload a featured image for the product.
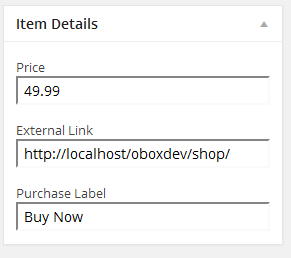
- To the right, you will see an Item Details box.
- Enter a Product Price
- Enter an External Link. This link is typically to a digital product, such as one hosted in your own Media Library or Download Monitor plugin, or on a third party site such as iTunes, RedBubble, or affiliate site etc.
- Enter some custom text for the purchase label, such as “Buy Now”

- Above this, select the Product Category your product belongs to, or create a new category by clicking on (Enter the Category name and hit enter. )
- Click Publish
Setup The Shop Page
- Click on Pages →
- Give your page a Title
- Select the Products List page template from the Template drop-down.
- Click Publish
- Go to → and add the page to your menu. Detailed instructions for setting up menus is included at the end of this documentation.
Add Additional Image Thumbnails On Product Posts
You may have additional images for your products, such as photos showing a different angle or color, or variations in style. All images attached to your product post can be easily inserted using a WordPress gallery, and will display as neat thumbnails below your product description. View an example on the Done Deal demo
- Within the product post, enter a heading for your gallery and highlight it. Select the H3 heading from the Format menu in your post editor, then hit Enter to move to the next line.
- Click on the Add Media button above the post editor.
- Click , then click Select Files to browse to your images and upload them
- Click Create Gallery on the far left.
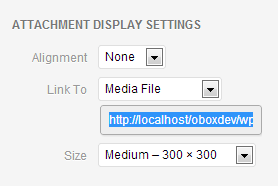
- Select each image (typically excluding your featured image)
- Edit the image Title
- Ensure Media File is selected in the Link To menu

- Click Create New Gallery in the bottom-right.