Have you seen Elementor?
Our flagship product, Layers has been acquired by the team at Elementor.
With a powerful, fast page builder, Elementor is the best way to get your site online with as little effort as possible.

Be sure to read the Social Commerce Intro for important information and requirements.
Install & Setup
The plugin installs 2 new pages to your WordPress Admin:
- Social Slider (used in your Social Commerce Homepage)
- Social Commerce (All the plugin options available).
Installing via WordPress
- Log in to your WordPress admin panel and go to
- If you have a previous version of Social Commerce, deactivate it, then delete it. Don’t worry, your sliders and most options are retained in your database.
- Click Add New, then click the link at the top
- Click the Browse button and navigate to the location of the obox-social-commerce.zip file. Select the file and click Open.
- Click Install Nowto begin the installation.
- Wait for the success message, then click
Installing via FTP
- Unzip the obox-social-commerce.zip to find the plugin folder. If you downloaded the package from Themeforest, unzip the downloaded file to find the obox-social-commerce.zip.
- Connect to your web host using an FTP client and upload the obox-social-commerce folder to the wp-content/plugins/ directory.
- Log in to your WordPress admin panel and go to
- Locate the plugin listing and click the Activate link.
Click in your WordPress admin menu to view the Facebook Page Tab Setup checklist.
Verify Configuration
This checklist will look for two main things:
- WooCommerce settings support SSL
- SSL enabled on your site
These are required at a minimum before your tab will work on Facebook. To minimize confusion over where issues begin, we don’t even allow the app to be added until these checkpoints are cleared.
Verify WooCommerce Settings
If you skipped our guide to Verify WooCommerce Settings, please do so now. The checker will give you specific advice on which settings are cleared and which need to be done.
Setup SSL
You will need a professionally signed SSL certificate setup for your domain. This is a Facebook requirement and cannot be skipped!
Additionally, all content you intend to be displayed in the Facebook page must be hosted on the domain your SSL certificate is setup for. If you have cloud-hosted images, for example, your host must assist you in domain masking them and ensuring they are protected by your site’s SSL.
For more information, check with your host or get a certificate at Host Gator
Once your site is setup behind SSL, click on Social Commerce in your WordPress admin menu to view the Facebook Page Tab Setup checklist and verify success under Step 2:
If this check is not green, ensure:
- the cert is setup for the domain your shop is on (if you have a subfolder or subdomain, it must match)
- your Site URLs under Settings > Reading are set to https
- All other manually entered URLs for media, in your theme options, in plugins or in Social Commerce (such as the logo) have been changed to https. WordPress automatically converts featured images and images inserted into your content.
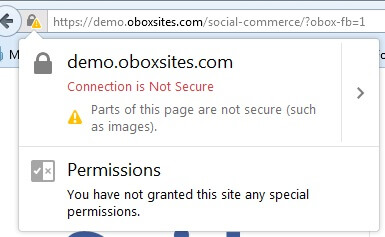
Check the secure badge in your browser address bar to ensure it is not reporting any errors. If an error is detected, click the badge to view the details and contact your host for help resolving them. or see our Troubleshooting docs for Social Commerce.
Example of fully secure URL in Firefox:
Example of insecure warning in Firefox:
For WordPress Multi-site setups
Where you need to enable SSL for a single site only, refer to the following:
https://webdevstudios.com/2015/02/11/how-to-set-up-https-on-wordpress/
If you are not using domain redrects, you can use this option:
and this plugin:
https://wordpress.org/plugins/really-simple-ssl/installation/
If you run into further problems with the checker, See Social Commerce: Troubleshooting Common Issues
Once you have a green light on SSL and Woocommerce, continue with the step-by-step instructions in the next article for cusotmizing Social Commerce.


