Have you seen Elementor?
Our flagship product, Layers has been acquired by the team at Elementor.
With a powerful, fast page builder, Elementor is the best way to get your site online with as little effort as possible.

This theme has been retired and is no longer being actively developed. Don’t worry, it should still work for some time and will continue to receive critical updates for up to one year from your original purchase date. Learn More Here
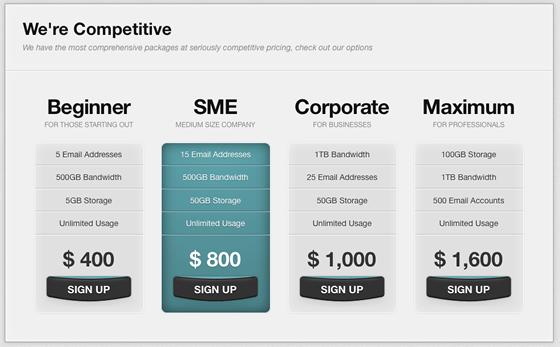
Pricing Block posts each relate to one column or block in your Pricing options page or widget.
Create Pricing Blocks
- Go to →
- Enter a Title for the pricing block, such as “Beginner” in the example above.
- On the right, you will see an Item Details box.
- Select whether or not the block must be the Preferred Choice. This will change the colour of the pricing block, as shown with SME above.
- Enter a Sub-Title, which will appear under the title.
- Enter a Price
- Enter a full URL in the Link field for where the button will link. This is typically a product post or a single page with more detailed information about this option.
- Enter some custom text for the Call to Action button (“Sign Up” in the above example)
- Above this in the Featured box, click to add the features this item or service has, or select existing Features from the list. For best results, build a master list of features that all Pricing Blocks share, and check off the features each tier or option enables. This allows for better consistency and comparison so your customers are not confused.
Create a Pricing Page
The Pricing page uses a combination of custom page template and widget areas to help you build a dynamic pricing layout. View the Theme Demo for an example of what you can do.
- Go to →
- Add a title for your page in the Title field
- If you want some intro text to appear above the Pricing Blocks, add it to the post editor.
- Select Pricing Page from the Template drop-down in the Page Attributes panel on the right
- Click Publish
Adding the Price Block Widget
- Go to → and drag the (Obox) Pricing Blocks widget to the Pricing Page widget panel.
- Expand the widget to access the widget options.
- Enter a title (optional)
- Enter an Excerpt if you wish to display some subtext above the blocks in the widget area (white background)
- Select the number of boxes to show. Pricing blocks will display by order of date with most-recent first. You can change post dates to manipulate this order. For best results, choose 5 or less.
- Click Save
- Drag other full-width Obox (orange) widgets here if desired. We are also displaying the Info Boxes widget on the theme demo.
If you are running the Widget-Driven Home Layout, you may also add the pricing blocks to your home page by dragging a second Pricing Blocks widget into the Home Page panel.


