Have you seen Elementor?

Our flagship product, Layers has been acquired by the team at Elementor.

With a powerful, fast page builder, Elementor is the best way to get your site online with as little effort as possible.

This theme has been retired and is no longer being actively developed. Don’t worry, it should still work for some time and will continue to receive critical updates for up to one year from your original purchase date. Learn More Here

Casual Content: Posts

General Content: Adding Posts with Post Formats

The following guide relates to version 2.0 of your theme or later. If you are still using WooTumblog, please upgrade your theme.

Your theme uses post formats to create a special layout for each post type in your blog list, and provides a special options panel on your post editor. The following instructions walk you through the basics of creating posts using these options.

  1. Click on PostsAdd New
  2. Add a Title
  3. Add some text to the post body, if desired.
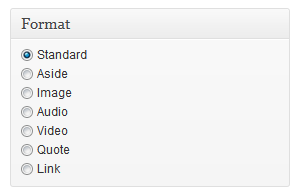
  4. Select a Post Format from the box to the right of the editor.
    tumblog_formats
  5. Depending on the format you chose, you will need to enter the corresponding data into the Options panel:

Standard Posts

This post format is for basic posts with no special format. Use it when creating posts with a lot of text, etc. You may Add a featured image using the Set Featured Image link. To break up the post in your main blog list, use the More tag.

Aside

Asides are best used with small bits of text, similar to a status update on a social network.

Image

The image post format should be used when you want to showcase a specific image or gallery slider with very little text, and allows you to create an image-only archive – excellent for building photo blogs or galleries separate from your portfolio.

  1. Add a Title
  2. Add some text to the post editor, if desired. Use the More tag to hide text in your blog list
  3. Select a post category
  4. Select the Image post format
  5. See below for adding your images

Single Image

Add a featured image using the Set Featured Image link.

Posts with Sliders (TinyBlog only)

To create a slider in your post where the image appears:

  1. Add a Title
  2. Add some text in the post editor if desired.
  3. Click the Add Media button above the post editor
  4. Click the Upload Files link and click Select Files
  5. Select your files. and confirm
  6. When finished uploading. click “Set Featured Image” on the left, select an image as your main thumbnail and click Set As Featured Image in the lower-right and close the media manager.
  7. Do not insert your additional images into the post – any images uploaded to the post media gallery will appear in the slider.
  8. Select Enable in the post options panel Image Slider setion to enable the slider on this post.
  9. Select a post category
  10. Select the Image post format and Publish

slider option

Audio

Use this post format to display a sleek audio player for single audio files. The theme uses JPlayer, which is compatible with all major browsers. See this article if you have issues with playback.

  1. Add a Title
  2. Add some text to the post editor, if desired. Use the More tag to hide text in your blog list
  3. Select a post category
  4. Select the Audio post format
  5. See below for adding your media

Use an MP3 File

  1. Upload your MP3 file to your server or use the Add Media button to upload it to WordPress
    • Note that most hosts limit uploads to 2MB so you may need to use a hosting service or FTP
  2. Copy the File URL and paste it into the .mp3 field of the post options panel

mp3

Use a Sound Embed

You can also embed media from any provider that offers an iFrame embed code, such as SoundCloud, MixCloud or ReverbNation.

Note that our themes only provide styling support for SoundCloud, so you may need to add some custom CSS for other providers.

  1. Click the share or embed link on your media at the original source
  2. Copy it into the SoundCloud Embed field of the post options

soundcloud


Video

The video post format accepts any video embed code from video hosts such as Vimeo, YouTube or Facebook, or you can use any oEmbed link.

  1. Add a Title
  2. Enter some text into the post editor, if desired. Use the More tag to hide text in your blog list
  3. Add a Featured Video using either the embed code or Video URL
  4. Optionally Add a featured image using the Set Featured Image link
  5. Select a post category
  6. Select the Video post format
  7. Click Publish


You can use this field with any iframe embed code, but note that the format tab / icon will say “Video”

Quote

This format is great for sharing inspirational quotes or testimonials.

  1. Enter the title or name you want the quote attributed to in the Title field
  2. Enter the content into the post editor
  3. If you want the name to link somewhere special, enter a URL into the Custom Link field in the post options panel.
  4. Choose a post category
  5. Select the Quote post format
  6. Click Publish

Link

The link post format creates a styled link using graphics and larger fonts. Use this when sharing links the way you would in a status update on a social network.

  1. Add a Title
  2. Enter the URL into the Custom Link field of the post editor
  3. Select the Link post format
  4. Click Publish