

Introduction
Dynamic content has an essential role in creating themed templates. It is now easier to create dynamic content blocks on Elementor Pro using JetEngine. With this plugin you will be able to add custom post types and taxonomies, create post types and taxonomies, display templates in lists and grid blocks as well as use unique widgets, and layout customization on Elementor Pro.
The great news is that you do not need any programming experience to use the JetEngine plugin for Elementor. All you need to do is follow our guide below and you’ll be well on your way to creating dynamic content blocks to Elementor.
Key Features of JetEngine:
- Dynamic field. Pull your metadata or dynamic content from the specified source and customise its look and feel.
- Dynamic image. Display featured images for the created custom post types or taxonomies and and customise them visually
- Dynamic repeater: You can set dynamic repeaters for taxonomies and custom posts types.
- Dynamic link. Add links to any post type or taxonomy
- Dynamic terms. Use the elementor widget to add dynamic
- Dynamic meta. You can add dynamic meta fields and customise as you see fit.
The Solution
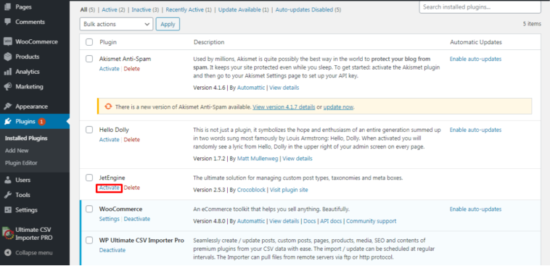
Step 1: Make Sure Your Plugins are installed
Your first step to creating dynamic content blocks to Elementor is to make sure that you have the proper plugins installed on WordPress and that they are working correctly. Log in to your WordPress website and go to your Dashboard>Plugins. Then make sure your JetEngine plugin is activated, as well as the Elementor and Elementor Pro plugin.
Step 2: Creating a Post Type
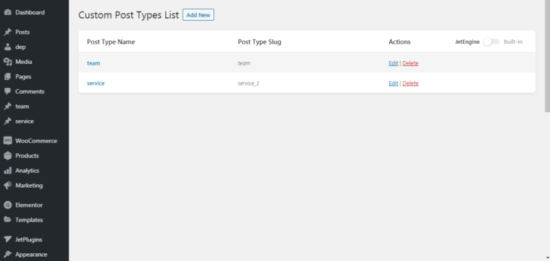
Once you’re done with checking your JetEngine and Elementor plugins, move to your Jet Engine Tab on the left-hand side. Just by hovering over Jet Engine a sub-menu will pop-up providing you with options. Including, Listings, Taxonomies and Post Types among others.
Here’s where it gets interesting. It may seem complex at first, but if you follow these steps carefully you will be successful.
Click on JetEngine, you’ll be redirected to Post Types > Custom Post Types List > Add New post. Hit the “Add New button”. So that you can create Custom Post Types of your desire. Else the empty field displays “No Item Found”.
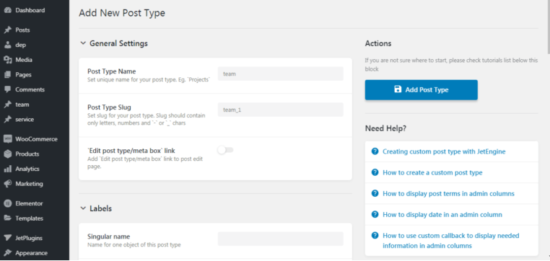
Step 3: Set Your Post Type Name
You will then see the general settings, labels, advanced settings, meta fields, admin columns. Now you will be able to add your post type name, post type slug, labels, and can add meta boxes. We’re focusing on setting your Post Type Name.
In the General Settings blocks set your Post Type Name, then set your Post Type Slug below that. Make sure you enable the Edit post type/meta box link option below the slug.
Step 4: Create a Custom Post Type Template
The next step is to create a custom post type template. To do this go to Listings>Listing Items>Add New. You can set up a listing item using Elementor. You will be able to drag and drop views, feel free to use whatever you’re comfortable with .
You will then see a Labels block. Make sure you save this information as Add post type so you don’t get confused. But if you’re used to JetEngine you can play around with the options.
Step 5: Go to Advanced Settings
For the most part you can leave the settings as is, but when you scroll down you will see Has archive, this will need to be enabled. If you have a more complex site with multiple levels of sectioning of content, we will also recommend enabling Hierarchical below the Has archive. Please set your Menu position to 1. You may add a different Menu Icon and edit your Support if you wish.
Step 6: Creating Custom Taxonomies
Open JetEngine plugin, locate to Taxonomies>Custom Taxonomies List>Add New Taxonomy.Here you will be able to add in your custom Meta information. Navigate to Meta Fields>New Meta Fields. Now you will be able to add Labels, Name ID, etc. Complete as you see fit.
Step 7: Creating a Custom Taxonomy Type Template
Next locate custom taxonomy type templates and proceed to Listings, then Listing Items>Add New. All this is done using your Elementor page builder and JetEngine. You can also make use of the drag and drop option if it’s easier for you.
Step 7: Setup Your Post Relations
Navigate to Relations> Post Relations List > Add New. You will find this under general settings. It is important that you mention the type of post relations. There are three many categories of Relation type:
- one to one: only allows one connection of post type. For example, if you’re dealing with a student database, each student will be assigned a specific student ID.
- one to many: links between one post type and other different post types. For example, an online store allows a customer to have many orders, which includes the order ID, customer information, billing etc.
- many to many: connect many post types with different post types. For example the relationship with Authors and books

