

Introduction
A website with strong visual effects is good for any business or blog. However, creating a visually impressive website can be a costly exercise. Luckily, we found a way around this in Elementor. It is now possible for you to create a wide range of visual effects without having any coding skills using the JetTricks plugin. You can create a parallax effect, create unfolded columns, add sticky elements and hotspot markers.
This plugin is quite easy to use and very helpful in adding strong visual and animation effects to your website.
Here are Some More Unique Features of the JetTricks Plugin:
- Choose from a wide variety of animation effects.
- Visually enhance your content in a few clicks.
- Customize your visual effects as you see fit.
- Includes a read more expandable widget and sticky columns.
- Add a parallax scrolling effect and section particles.
Once you have installed the Elementor, Elementor Pro, JetEngine and JetTricks plugin you can begin adding advanced visual effects in Elementor.
The Solution
How to Add Advanced Visual Effects in Elementor using JetTricks
We will be guiding you through adding the top three Advanced Visual Effects to add through Elementor after you have successfully installed the JetTricks plugin and activated it. Once this is done successfully you can navigate to the JetTricks tab in your Dashboard and begin editing.
Adding a Sticky Column Effect
Sticky columns enable you to display specific columns at all times while the user scrolls through your website. Here’s how you can add the sticky column effect to Elementor.
1. Add a new section and select the columns layout. Then place the necessary content into the column as well as the rest of the columns, which will be scrolled. Then click on Edit Column, to add the sticky column effect.
2. Now open the JetTricks tab. Then enable the Sticky Column option. This will activate the effect and the options will appear on the page.
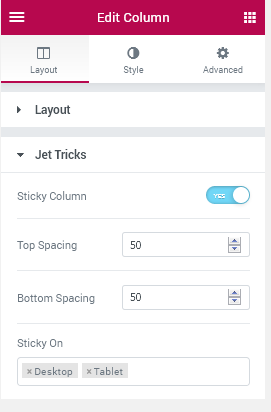
3. Now you can proceed to further style the layout and customize it to your preference. This includes adding:
-
- Top spacing: this the top scaling value that determines the starting point when scrolling a sticky column.
- Bottom Spacing: this determines the end point of a sticky column
- Sticky on: now you can select on which devices this effect must be activated.
Create Hotspots on Your Pages
A Hotspot widget is pretty cool. It allows you to emphasize details on specific pages.
1. The first thing you need to do is add your content. In this case it would be an image. You need to select the image you’re going to add hotspots to from your media library or upload it from your PC.
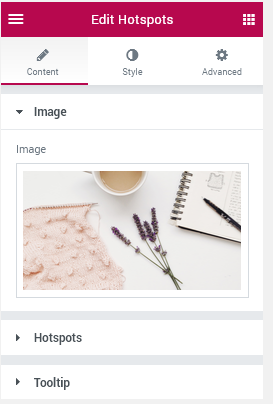
2. Next expand the Hotspots tab, then click the Add Item button in order to add a new hotspot to the image you have chosen.
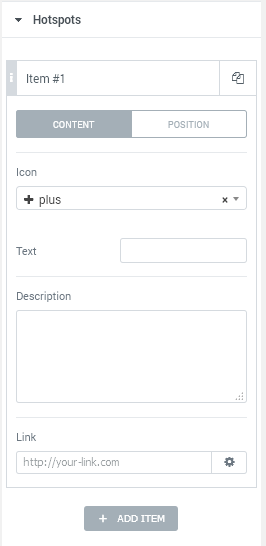
3. You may switch between Content and Position tabs in order to specify which content you want the hotspot on and where it is needed. You will need to:
-
- Add an Icon to use for the hotspot marker.
- Add Text to show beside the icon
- Add a Description that will be displayed once a user hovers over the hotspot.
- Add a Link that will open one a user clicks on the hotspots market.
- Add your Horizontal Position and Vertical Position to your hotspots
4. You can add as many items as you want to.
5. Next, you will need to add your tooltip. A tooltip is a message which appears when a cursor is positioned over an icon, image, hyperlink.
- You will need to begin with Placement. This is where you select where you want the tooltip with a description to be displayed. It is basically the position where you want the tooltip.
- You can also decide whether you want to use an arrow, the arrow type and size as well as the trigger.
- You can also set the duration or hide the duration or delay.
- You will be able to animate your tooltip by selecting suiting animation effects which will be used when the tooltip appears or disappears.
- You will then be able to style your tooltip as desired once you are happy with your tooltip settings.
Add the Unfold Widget
The last, most popular advanced visual effect widget is the Unfold widget is used to make the content added to the widget hidden or displayed in a visually enhanced way. Think of it as an expandable widget.
- Firstly, you would need to access the settings under the Content tab.
- Then you will need to enable the Fold option to make the initial content show on the page. If the fold option is disabled, your content will stay hidden until a user clicks in the Unfold button.
- You must configure the Closed Height too. This basically means specifying the height of the unfolded content when it is closed. You can switch between Fold and Unfold at any given time.
- It is also possible for you to set how fast or how slow the Fold/Unfold option will open or close. This is usually known as the Duration.
- Thereafter you will be able to set the Easing when the content is folded or unfolded. This ranges between Linear, Sine, Expo, Cirrc, Back, InOutSine and InOutExpo.
Next, you will need to work on Content…
6. In the Content Field you will need to add the content you want to be placed into the Fold/Unfold widget. To do this you can use HTML markup for texts and media objects are optional too.

7. After this is done, you will need to add a Button. This button will help you switch between Fold/Unfold options.
8. Next you will have to style the Unfold Widget. There are over 30 styling options for you to choose from. This includes, color, image, position and attachment. This is only the background styling options. There are tons more.

