

Introduction
Having a user-friendly and mobile friendly website when you’re running hotel accommodation is essential to your business. Think about it this way: your website is the first place where potential guests look for information about their accommodation preference. This is why it is important that your services’ unique selling points are presented in an attractive way and managed appropriately.
Adding an accommodation search directory to your website can make all the difference. In fact, for some guests, not having this type of filtering system could be a deal breaker. Sites like TripAdvisor have prioritised their search directory and have seen the results. It is one of those sites users flock to whenever they are in need of accommodation, anywhere in the world. AirBnB is another example of a high impact, user and mobile friendly site, with a very impressive search directory functionality.
Now, for up and coming small businesses, who do not necessarily have the funds to hire a web-designer, this may seem unrealistic at this point, but with Elementor and the JetSmartFilter plugin, you no longer need to worry about the price.
Here are Five Compelling Features of the JetSmartFilter Plugin
- User-friendly: JetSmartFilter is an easy-to-use plugin. You do not need to have extensive skills or experience to install and activate it on your website, nor into creating or editing a product/service.
- Fully-customizable: You will be able to customize your search filter bars and settings for your website.
- Match-all: All JetSmartFilters can be applied to any WordPress or Elementor theme, page and post type.
- Layerable: You can mix and match nine filter types to create a customized hierarchy.
- Editor- friendly: You can build and style your filter types according to your needs in both Elementor and Gutenberg.
The Solution
How to Add Accomodation Search Director to Elementor: a Step-by- Step Guide.
Please note that to use JetSmartFilter, you will need to add two additional widgets, which is JetEngine and JetWooBuilder.
Step 1: Create a Filter
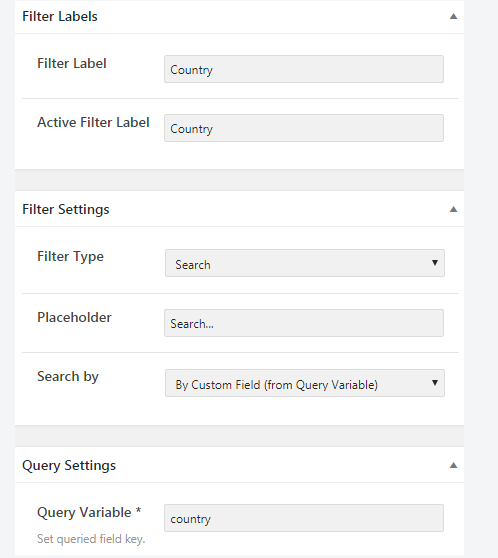
You will need to log into your WordPress Dashboard and navigate to the Smart Filters > Add New. Here, you will need to fill fields such as Name and Filter labels and then choose the Search option in the Filter Type menu.
After this, you will need to choose from two variants in the Search by bar. Please note that the Default WordPress search will apply a default search to this filter. Next, By Custom Field option, the user will make searches in the fields mentioned in the Query Variable text area. You must define the name of the field in the Query Variable.
Step 2: Add Filter to the page
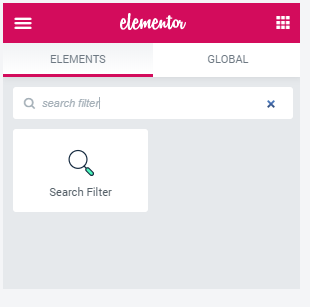
Open the page or post you want to add the Search filter to and then place a Listing Grid on the specific page or post. Please note that it has to be filled with the publications that have the custom field, which you initially typed in the Query Variable bar in step 1. Then drag and drop the search filter widget in the needed section.
When you get to the Content settings, you must select the filter and choose Jet Engine from the options.
Then style and format your search filter as desired. Once you’re happy click on Publish and you’ll be good to go.

If you would like to find out how to add more advanced filters to products or services. Check out our new post:

