Introduction
There are many online shops trying to reach the right audience. Multilingual websites might be your best option to compete with other businesses. It will help you rise above your competitors. and help establish your brand. This will allow you to gain access in different markets and distinguish your brand from your competitors.
Customers from other countries will be more inclined to share your website content with others if they can understand it in their own language. A multilingual website also gives your brand credibility. You can make your customers happy by creating content on your website in their native language.
To provide the best user experience, you should use the best practices to develop a multilingual website.
Webflow enables you to add a multilingual function to your website. We’ll explain this functionality in our guide below:
The Solution
Two Ways to Make Your Site Multilingual with Webflow
With Webflow, you have the option to make your website multilingual by either duplicating websites and pages.
Let’s take a look at both options:
1. Duplicate Pages or Websites
Duplicating Pages
Duplicating pages is one of the most common ways to integrate multilingual functionality onto your website. However, it is not always the easiest option.
It is possible to duplicate collection items through static pages on Webflow. You can do this by taking all of your pages and then creating duplicates of them. Once you have done this, you can proceed to creating folders for each language.
It is best practice to do research on which countries your customers are from and the focus on creating folders for those languages. It is pointless to add languages to your website, which will bring you clients. For example, if most of your clients are from Germany, it would make sense to add the German language to your website.
Another important point is to make time for your primary website to be managed. Remember, every time you make changes to content on your original website, you will need to update your duplicate pages as well.
Duplicate Website
If you decide to create duplicate websites, you can create language subdirectories. Remember, search engines like Google will penalize you if you do not add hreflang tags. The purpose of these tags are to inform Google about pages with similar content, with different language targets.
You also need to be conscious of your resources. Remember, you cannot duplicate your website or pages into another language, if you are not capable of writing the content yourself. You will then need to hire a translator to do it for you.
2. Weglot integration
A Weglot integration is another option. This is Webflow’s own translation solution and was designed to eliminate other complicated manual steps. Weglot is also a no code solution. This means you will have a multilingual website in no time, without any manual input from you.
This integration only works by scanning the content of your original page, then detecting the content visible on the page, and replacing the content with the translations. You will be able to see the first layer of the automatic translations and edit, manage and fine-tune your content on your Weglot dashboard.
You will also have access to translators. You don’t have to worry about manual page by page translation or websites. Webglot takes care of all the technicalities of having a Webflow website. All you need to do is to focus on the content of your pages.
Open a Weglot account to get started
How to Create A Multilingual Webflow Website with Weglot
Step One: Create Your Account
You will need to create a Webflow account to get started on your multilingual project. All you need to do is visit the website and select Getting Started.
Step Two: Add Your Domain Name
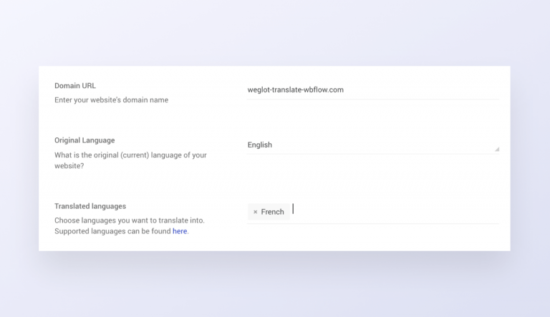
Next, you will be prompted to add your domain name (the address where Internet users can access your website), which will add the original language of your website and the languages you would like to add.
Step Three: Configure Your DNS Records
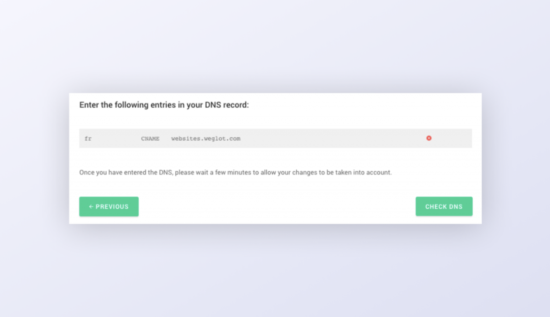
You need to create your subdomains by configuring your DNS records. This can be done through your domain name provider. Search for your DNS tab and then create a new CNAME entry.
Step Four: Add Custom Code in Webflow
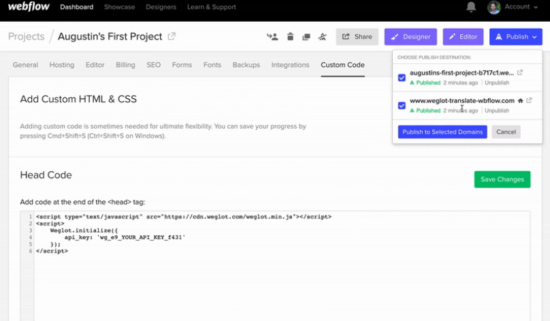
Copy and paste the JavaScript code snippet from your Weglot account. Next, go to Settings – Custom Code in your Webflow admin area. Copy the Weglot code into your Head Code Tag.
Step Five: Save and Publish
Save your changes and publish them. This is it. You now have a multilingual webflow website.
Find out more about adding a multilingual function to your Webflow site.


