

The Solution
All Obox Themes come translation-ready. Instead of making you create a file containing the human-readable text from a particular theme, we’ve included that file with the theme itself. All you need to do is add the translations in your own language.
Here’s a quick rundown of the three file types you will deal with in translations and what they are for:
.pot: This file is a “portable object template” that contains all of the text to be translated. Since it’s just a template, it serves as the basis for your translation. It doesn’t contain the translations themselves..po: The “portable object” file contains the original text and the translations. This is the file you edit and which contains the orginal English text elements from the theme..mo: This is the “machine object file.” When your translation is complete, you will convert or export your.pofile to this file type so that WordPress can use it.
There are two primary ways to translate your theme – using an application on your computer, or using a plugin in WordPress.
Using a Plugin (Recommended)
For themes that include language support, you can easily translate the theme using a plugin such as Loco Translate
For specific help with translating text coming from the WooCommerce plugin, see Translating WooCommerce
To find your theme in the plugin:
- Go to →
- Click the +New Language link next to your theme
- Select your language and start translating
- When complete, click Save
Example of “Read More” buttons in Retail Therapy translated to Dutch using Loco Translate:

For translations to take effect, your site must be set to this language locale in Settings > General, or a language switching plugin must be installed and the site switched to that locale by the reader. If you are using a plugin like WPML for language switching, it is strongly recommended you use it for theme translation also. For detailed instructions on using Loco Translate, please visit the Plugin homepage.
WPML (premium)
WPML is the most robust translation plugin and comes with the benefit of premium support from the plugin authors.
To translate your theme using WPML. go to→ and either enable String Translation if you have the extension, or enter ocmx into the text domain field. You must have a .mo file created in your language with Codestyling Localization for the second option to work.
Next, go to → and select the post types and taxonomies you want to be translatable.
WPML Translating Your Contents
Using PoEdit (advanced)
There are several translations editors out there, but PoEdit has been around for several years and is a favorite among developers and translators in the WordPress community. It’s also free and well documented.
- Download a copy of your theme. Go to your Obox Dashboard and download a copy of your theme. Unzip the file to your desktop.
- Download Poedit. When the download completes, unzip the file to your desktop and open the application. You will see the Welcome to PoEdit screen.
- Click Create new translation
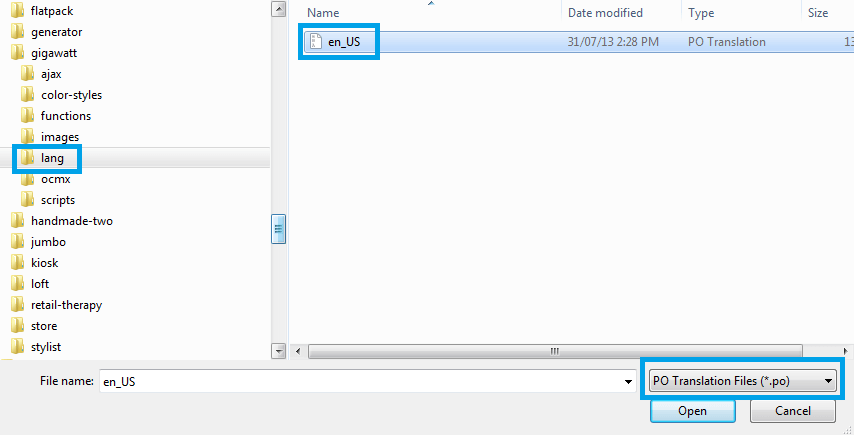
- Browse to your desktop and open the theme folder, then open the lang or languages folder
- In the lower-right of the file browser window, select PO Transaltion files (*.po) from the drop-down, select the en file and click Open
- You will be prompted to select the language of your new translation. Select one and click OK
- The translation screen will open and show you all of the text strings found in the theme.
- Highlight each line and enter the translation in the box at the bottom.
-
Some strings contain Unicode or HTML. For these, copy the original content into your translation, and translate just the words. This ensures the symbols or HTML elements are carried over.
-
- When you’re finished, click the Save button at top-left. It should bring you back to the same lang or languages folder you opened the original file from. You will notice your files are named with the country and language abbreviation for the language you chose. Click Save on the file browser.
- You will need to upload the new .po and .mo file to your web server via FTP or your hosting control panel file browser. Make sure it goes into your theme’s language folder, example wp-content/themes/gigawatt/lang
- If your WordPress install is already set to this language, you don’t need to do anything else. If this is a secondary language you are offering users to switch to, you will need a content translation plugin such as WPML or qTranslate.
Important: Not all of the text on your site is controlled by the theme translation file. You may have plugins or content that injects text also. Plugins can be translated using the same process as above. For translating WooCommerce and any text in your products/shop/cart, see Translating WooCommerce
Recommended Reading
Translating WordPress themes is a complex topic. This article focuses primarily on translating hard-coded text in the theme files, but there are other things to consider such as widgets, theme option text and your own content.
The following resources will help you gain additional perspective on translations in WordPress.
- Barry van Someren’s tutorial on translating WordPress themes with the Google Translator Toolkit
- Translating WordPress
- WP-Translations

