Have you seen Elementor?
Our flagship product, Layers has been acquired by the team at Elementor.
With a powerful, fast page builder, Elementor is the best way to get your site online with as little effort as possible.

You can customize photogenic in several ways, from the basic options in Theme Options, to full customization using Custom CSS. Below we will walk you through the WordPress Customizer, and explain how you can use the Custom CSS panel for extended customizations.
WordPress Customizer
WordPress 3.4+ introduces a user-friendly and simple theme customization panel that assists you in tweaking certain aspects of your theme such as the logo, favicon, colors, background and other standard WordPress display settings. Through the customizer, you can create a completely new color theme to make Ambition reflect your style and personality.
Oh no, I screwed up! How can I go back to the theme defaults?
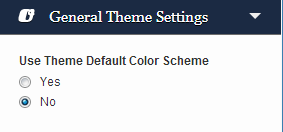
You can reset your colors to the default by expanding the Theme Color Scheme section:
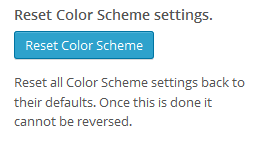
To reset everything and start over, click the Reset Color Scheme button in this section. This is also useful if you had a different Obox theme activated prior to Photogenic, and notice some of the old colors still applying to your new theme.
The customizer is still an early feature of WordPress , and as such is not perfect. If a color change is not updating in the preview panel, Save and refresh the page.
How to customize your theme
- Click → OR
- Click →
- Click Customize next to the theme thumbnail.
- Expand the General Theme Settings section and ensure it is set to NO to enable use of your custom colors.
You will then have access to the following customizable options, with Obox theme options colored in Blue:
- Header
- Content
- Footer
- Colors
- Header Image
- Background Image
Header
- Header Container Background: Changes the color of the header area. If you have a header background, this will only be visible on load.
- Header Text: Changes the color of the header title on all pages
- Navigation Link Color: Changes the color of the main menu links
- Navigation Link Hover Color : Color of main menu links when hovered
- Sub-Menu Link Color: Color of links in any sub-menus
- Sub-Menu Link Hover Color: Color of links in any sub-menus when hovered
Content
- : Color of body text in widgets and posts or pages. How you color or format your text in the post editor will take precedence in most cases. Some widgets or plugins may ignore this setting, such as the Twitter widget.
- : Color of links in body text and widgets. Some widgets or plugins may ignore this setting, such as the Twitter widget.
- : Color of general links when hovered
- : By default, there is no visible background on the image containers on album pages or single image posts. Choosing a different color here than your background will allow images that are not wide enough to look more balanced.
- : Borders in posts and pages, such as the line above the comments area
- : Title of individual posts on the homepage widgets, album page, category pages, archives and blog
- : Date meta under titles on the category pages, archives and blog.
- : Color of the widget titles in the sidebar
Footer
- : Color of the copyright/Custom Footer Text below the widget area
- : Color of the bar in the footer containing your copyright/Custom Footer Text
- : Color of back to top button background.
Colors (wordpress Option)
Set your content area background color. You may optionally set a background image (next)
Header Image
Set a Header Background image to display on your homepage and anywhere a featured image or category collage is not automatically generated for the header background. Optionally leave this blank to just choose a background color (set in the Header section)
Background Image
Set a background image for your content area if preferred (otherwise it will defualt to your Colors color option).
Tileable images:
- Background Repeat: Select Tile
- Background Position: Center
- Background Attachment: Your choice
For large image backgrounds: Backgrounds should be at least 1920 pixel wide to avoid unsightly bars on the sides of your website on large screens.
- Background Repeat: Tile Horizontally
- Background Position: Center
- Background Attachment: Fixed
Custom CSS
For elements not covered by the Customizer, you can use custom CSS to change just about anything. We offer a Custom Styling area in to store your styles. This option saves custom CSS in your WordPress database. If your theme files are lost or if you need to reinstall, everything in your database is retained and safe. Older themes may not have this option.
- Go to →
- Enter or paste your styles into the Custom CSS field. You can grab styles using Inspect Element in your browser.
- Click Save
custom.css stylesheet
This option may be easier to manage for advanced designers, but does require backup and maintenance if the theme files need to be reinstalled for any reason.
- Go to→
- Click the custom.css link in the lower-right corner
- Enter or paste your codes on a blank link below any existing text
- Click Update File
If your custom.css file is not loading, add @import url(custom.css); to the Custom CSS field in Theme Options.
Only copy styles you have changed or will customize into these areas – never copy the entire theme stylesheet as this can impede your theme’s ability to recognize important changes we make in hotfixes and theme updates.
Customizing Fonts
Font replacement requires extensive Custom CSS. The following articles provide some direction on how to customize your fonts:
- Overview of WP-Google-Fonts for Extended Typography Control
- How to Find the ID or class name for an element to use in Custom CSS
- Where can I get help with modifications or advanced Custom CSS?