Have you seen Elementor?
Our flagship product, Layers has been acquired by the team at Elementor.
With a powerful, fast page builder, Elementor is the best way to get your site online with as little effort as possible.

The Obox Theme Options panel controls most global customization options for your theme. Further options are provided in the Page Options panels. Please read through each Page template’s article for details on using those extended options.
Configure Theme Options
Go to from your WordPress admin menu.
Custom Logo
Favicon
 This option allows you to upload a favicon, which is the tiny icon displayed in the browser address bar when visitors view your site. The dimensions should be 16 x 16 pixels. Click on Browse to upload an image file from your hard-drive, or enter the URL of your image file if it is hosted elsewhere.
You can upload as many logos as you like and then simply switch to the one you prefer by clicking on the thumbnail. For best results, your favicon should be a .gif or 24-bit .png. You should not use a .jpg as it will probably not display.
This option allows you to upload a favicon, which is the tiny icon displayed in the browser address bar when visitors view your site. The dimensions should be 16 x 16 pixels. Click on Browse to upload an image file from your hard-drive, or enter the URL of your image file if it is hosted elsewhere.
You can upload as many logos as you like and then simply switch to the one you prefer by clicking on the thumbnail. For best results, your favicon should be a .gif or 24-bit .png. You should not use a .jpg as it will probably not display.
Custom Login Logo
Click Browse to select a custom login logo, which is displayed on the WordPress admin login page. Recommended dimensions are 326px by 82pxFacebook Sharing Options
This option allows you to disable the theme's OpenGraph support if you are using a plugin that duplicates the feature and does not allow disabling it. If left on, you may set a default site image for Facebook to use if it cannot find a featured image on the page or post being shared. Your image must be at least 200px by 200px. View this article for more on Facebook OpenGraph and how it works in your theme.
Navigation Dots
Select where you would like the navigation dots to appear on the homepage. Navigation dots appear in this location as the visitor scrolls down the page and allows for quickly jumping around to different sections.
Post Meta & Content Display
These settings control which post meta is displayed in posts.
- Date Check on to display dates in your post meta.
- Tags Check to show tags on single posts
- Show Social Sharing Check to display social sharing options in your posts
- Category Link Uncheck to hide the category link on posts.
- Author Link Uncheck to hide the author link on posts.
- Show Author Block on Posts Uncheck to hide the author info at the bottom of the post.
- Show Next & Previous Links Uncheck to hide the post navigation below the post content
Page Meta
These settings control which post meta is displayed in default or full-width pages.
- Show Date: check to show the date
- Show Author: Uncheck to hide the author link in the blog list and single posts
- Show Author Block: Uncheck to hide the author avatar and blurb on the right side of single posts
- Show Social Sharing Check to display social sharing options in your pages
Custom Styling
This field allows you to enter any Custom CSS overrides used to customize the theme beyond simple color changes. Add any styles from the style.css or create your own here. Content in this field is saved to the database, so you won't lose changes if reinstalling the theme.
[TO – Socialcode]
Custom RSS URL
Enter the URL to your custom feed, such as Feedburner if you have one. If left blank, the default WordPress RSS URLs will be used.
Site Layout Tab
Site Layout
Choose between a boxed or full-width layout. Like the thumbnails depict, “boxed” means the initial width of the site is set to a specific width and the background shows on both sides.
Home Page Layout
This is discussed in detail at the end of this article.
Header Tab
Header Gradient
Choose whether to show or hide the slight shadow at the top of the screen
Title Banner display
Select whether or not to display the title banner, which is the bar across the top of interior pages.
Page Title Description
If the Title banner is enabled, choose whether to display the description below the post or page title. This text is fed in from the Excerpt field.
Navigation
Enter a custom label for the menu button if desired. Default is “Menu”. For no label, leave the field blank.
Footer
Custom Footer Text
This section gives you some control over the copyright area of the footer. You can put simple HTML in this field such as links or small images.
Hide Obox Logo
All of our themes come with an Obox Logo at the bottom right of the footer. To switch this off, simply uncheck the box (although you get extra awesome points for leaving it on!)
Site Analytics
If you would like a quick and painless way to implement Google Analytics, paste your preferred tracking code into this text area. Your code will then be inserted into the footer of the theme, which is best for performance reasons. Learn more about Google Analytics here.

Click Save Changes
Setup the Homepage
- Start by clicking on →
- Ensure Latest Posts is selected. This allows WordPress to use the dynamic homepage.
- Save any changes, then return to in the left-hand admin menu and choose
- Click the Site Layout tab
- Select a Home Page Layout by clicking on one of the layout thumbnails. Each is explained below.
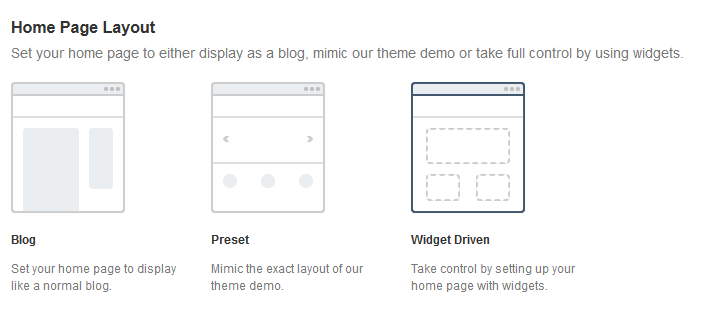
Blog Style
Display posts and a sidebar (if enabled). This will take the settings chosen for the sidebar layout and anything else affecting the blog.
Widget Driven
The aim of widget driven layout is to give you much more control over your home page layout, content and widget options than the Preset layout allows. By using widgets you will be able to determine exactly how much content, and the type of content, that is displayed. Once active you will need to go to → to add the correct widgets to the widget panels. Widgets are explained in detail in the next article, Configure Your Widgets.
If you prefer the fast and easy route, continue on to the Preset Layout options below.
Preset Layout
Choose this option if you are new to WordPress or want a similar layout as our page demo and don’t want to mess around with widgets. Note that the Preset options are limited – if you need more control you must use the Widget-Driven layout and skip these steps.
Feature Slider
Displays Slider posts
- Select Yes in Exclude Widget if you don’t want to display the slider, otherwise leave default
- Select the number of slides in the Post Count menu
- Enter an Auto Slide Interval (seconds) or set to 0 for no auto-sliding
Services Three Column
Displays Services posts
- Enter a Title, if desired (shown centered above the widget)
- Select a Category, or leave All selected
- Select the number of slides in the Post Count menu
- Select whether to Show Excerpts
- Enter the desired Character Length (to ensure it shows ALL your content, enter a high number like 500)
Portfolio Three Column
Displays Portfolio Posts
- Enter a Title, if desired (shown centered above the widget)
- Enter some Intro Text if desired
- Select a Category, or leave All selected
- Select the number of slides in the Post Count menu
- Select whether to show Videos (if your posts have featured videos) or Featured Images. Video posts using oEmbed links will generate a thumbnail automatically if Images is selected.
Team
Displays Team Posts in four columns
- Enter a Title, if desired (shown centered above the widget)
- Enter some Intro Text if desired
- Select a Category, or leave All selected
- Select the number of slides in the Post Count menu
Text
- Enter a Title, if desired (shown centered above the widget)
- Enter some Intro Text if desired. You may use arbitrary HTML here to add links etc but please note that this widget is formatted in terms of font style, alignment, color and size.
Testimonials
Displays Testimonials
- Enter a Title, if desired (shown centered above the widget)
- Select a Category, or leave All selected
- Select the number of slides in the Post Count menu
- Enter an Auto Slide Interval (seconds) or set to 0 for no auto-sliding
Partners Six Column
Displays Partners
- Enter a Title, if desired (shown centered above the widget)
- Enter some Intro Text if desired.
- Select a Category, or leave All selected
- Select the number of slides in the Post Count menu
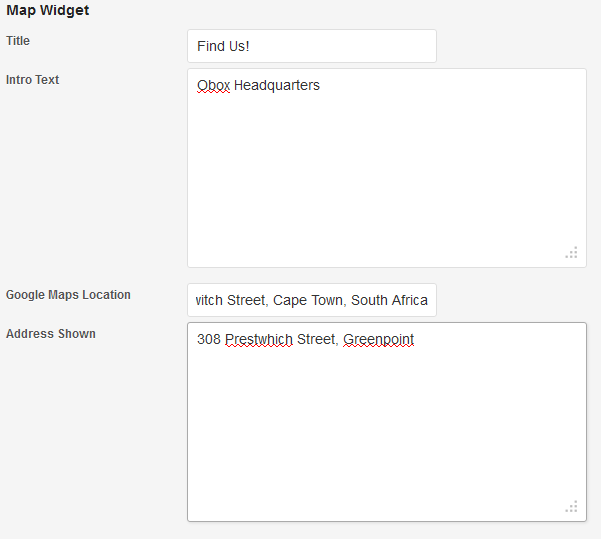
Map
- Enter a Title, if desired (shown left-aligned)
- Enter some Intro Text if desired
- Enter your full street address with zip or latitude/longitude into the Map Location field
- Enter your address in the Address Shown. For best results, enter it on one line. Example:
Click Save Options