Introduction
SEO marketing is essential in today’s highly competitive market.
Millions of people use search engines every day to find answers to their questions and solutions to their problems.
SEO can be a great way to get traffic to your website, blog or online store. The aim of SEO is to get targeted traffic from search engines. SEO captures existing demand for users’ queries, if your site is set up in such a way that the pages and content target specific user needs/concerns in your niche, the more likely it is to show up for the right search terms.
When looking for a CMS to build your website, the platform’s SEO friendliness and ease of optimisation are big factors. Today we look at Webflow’s SEO features, to help you figure out if it’s the right platform for you.
The Solution
What is SEO?
SEO stands for Search engine optimization. SEO is a set of rules that optimize your website to rank higher in search engines’ organic results. This is the process you should follow to improve your website’s visibility in search engines and to get more visitors.
SEO serves two primary purposes. The first goal is to understand the needs of users online and create high-quality content that meets their expectations. The second goal is to create a website search engines can index and understand.
Good SEO practices are a great way of increasing the quality of a site by making it more user-friendly, quicker, and easier to navigate.
A Guide to How You Can Use Webflow to Create Your SEO Campaign
Webflow helps you optimize your content to be search engine friendly. Webflow can help you improve clarity, utility, and shareability in seven key areas, which we will discuss in this guide.
Setup Your Sites SEO
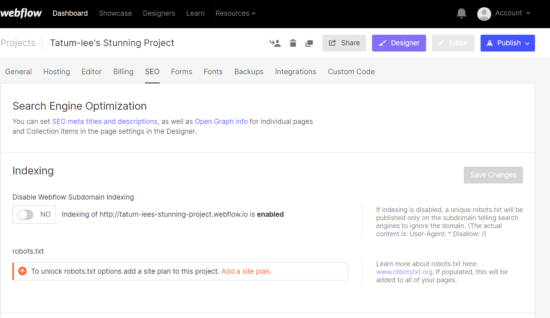
Once you open your dashboard, go ahead and navigate to the your sites tab. You will then be directed to a new page. Where you will see the title Search Engine Optimization at the top. The first thing you need to do is enable your indexing. Search engines like Google will then be able to add your web content to its index.
Add Your Site Plan & Map
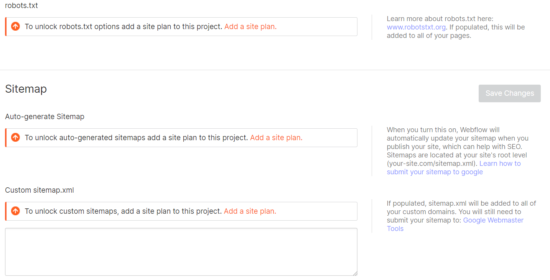
A sitemap file is where you can provide information about pages, videos and other files on your website, as well as the relationships between them. It is basically a blueprint for your website. If you don’t have one yet, WebFlow can generate one for you, but you will need to add your site plan.
A site plan is a basic map of your website that shows you the pages you intend to create and the information you want. This helps you visualize all the pieces before you begin putting them together. Once you add this into the field. Webflow will generate a sitemap for you.
Google Site Verification
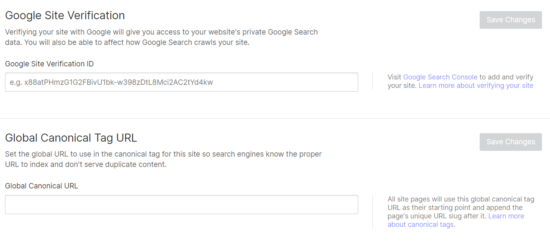
Step 3, requires that you submit your site for Google verification. Google verification will give you access to very important search data regarding your website. You will then need to go to Google Search Console and verify your website there. You can then proceed to setting your Global Canonical Tag URL. This will notify search engines about the proper URL to index and will make sure duplicate content is not served.
Set Your Title Tag & Meta Descriptions
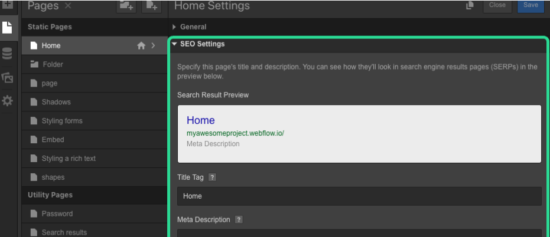
The title tag is used often as the title of search results. It is recommended that it not exceed 60 characters.
Sometimes meta description isn’t used in search results. Google may show you a snippet of the webpage that contains the search terms someone has entered into Google. If your meta description is visible, it can help people click through to your site — especially if it’s related to your content.
Collection Page SEO and Title Descriptions
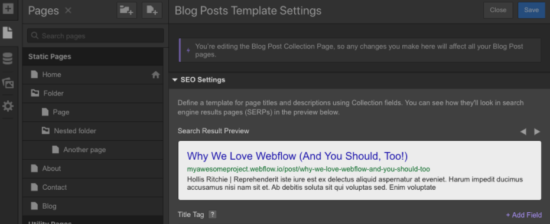
Next, You will define a pattern for Collection pages. This pattern will be used by all Pages in a Collection to create their title tag, meta description and meta description. This will ensure that all Collection Items pull their SEO settings from each Collection according to the pattern you have defined.
Go to the Pages Panel’s Collection Template settings and create the Collection fields that you would like to use in your SEO meta title or description.
Setup Your Redirect Management
Your old URL can still be found in search results. It may also be mentioned in blog posts or forum posts, bookmarked, printed on business cards or other materials. Anybody who visits the old URL will be redirected to a 404 page. Users who click the old URL when a redirect is set up will be redirected to the new URL.
Google will eventually index the new site structure, and all old URLs will be updated. But, 301 redirects are a good practice, especially if your old URL is still relevant.
How to redirect a page:
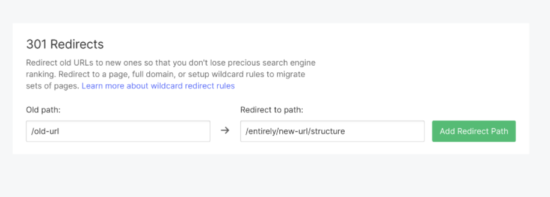
- Open Project Settings > Hosting >301 redirects
- In the “Old Path” field, add the old URL (eg. Add the old URL in the “Old Path” field (eg.
- Add the new URL in the “Redirect to Page” field (/entirely/new-url/structure)
- Add the redirect path to your site and publish it
- You can test the redirect by entering the URL in a new tab.
Image Alt tag Editing
An Alt attribute refers to the alternative text that is displayed when an image isn’t loaded on your site. This can be a short description of the image. This information is important for accessibility and search engines.
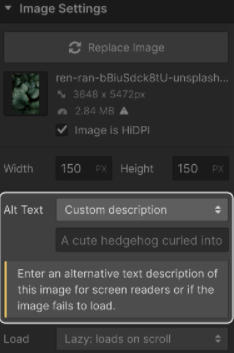
From the Settings panel, you can add an Alt attribute to each image.
Find out more about Webflow SEO