Introduction
If you’re busy building an advanced website or already have one, like an eCommerce site or a Real Estate listing, you will need to add search filters for your users. This will not only improve navigation but make sure that your site is user-friendly. There is nothing worse than owning a website with tons of content that is difficult to find. Many inexperienced website-owners have this problem today, unfortunately this can be an expensive fix. It’s best to start off the right way, by doing things correctly the first time round.
Imagine browsing through an online shoe store in your area, to locate a specific type of shoe, only to discover that the shop you’ve been browsing through for the last hour does not have the type of shoe you’re looking for or that it has bad reviews. Websites with a filtering capability will allow you to choose these parameters first, this way you won’t waste any time on the website and you can find what you’re looking for with ease.
We consider having a filter on your website and absolute must. Adding one improves your users experience and just generally makes life a whole lot easier. WordPress does have a native filtering option, however it is very limited. This is why you will find a vast number of filtering plugins. We have found JetSmartFilters by Crocoblock to be the best
Before we start, make sure that you have toggled on your plugins. Especially the JetEngine, JetWooBuilder, Elementor and Elementor Pro. You will also need to check that your products have product attributes. All you need to do is go to Products > Attributes, then enter the name of your product and the slug. Once it’s done go to the product and add your product attribute that you have created at the bottom of the product page and update.
The Solution
Here’s how you can add advanced filters to Elementor
Step 1: Adding Product Type Filter
Navigate to Smart Filters in your dashboard menu. Then click Add New Filter. We recommend that the first filter you create is the Product Type Filter, which will help your customers sort your product by product type. For example, if your product was check boxes you would name it as: Checkboxes Filter- Product Type (Shop Template). By doing this you have named the product, assigned the filter and assigned which template this filter must be used on.
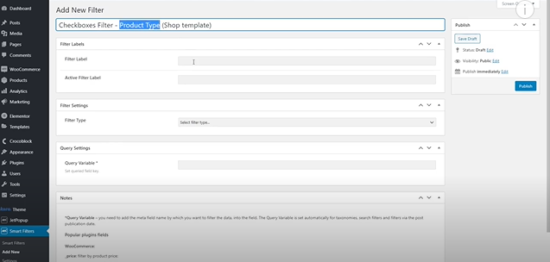
Once you have added the naming convention, you can start filling in the fields below. Your data source will be Taxonomies. Then choose Product Type in the Taxonomy field. Set the relational operator to Union and Exclude/Include field to None, then go ahead and publish.
Step 2: Adding a Product Length Filter
This is how you add a visual filter widget to your shop. Smart Filters > Add New Filters . This is how you would assign the Product Length Filter in the title: Color Filter- Product Color (Shop Template). Once that is done go ahead and complete the fields below:
- Filter Type> Visual.
- Taxonomy> Product Color
- Type> Color
- Behavior> Checkbox
- Options list> New Option- Select your color options.
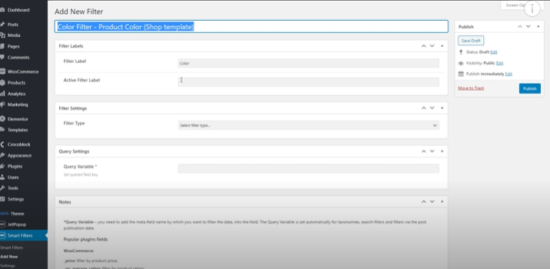
After you have done this, you can go ahead and click update.
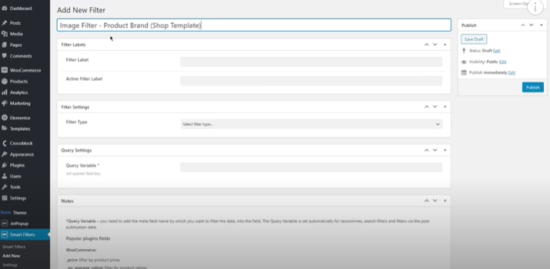
Step 3: Add Image Filter
Again, Smart Filters > Add New Filter. This is how you would assign the Product Image Filter in the title: Image Filter- Product Brand (Shop Template).
- Filter label > Visual
- Data Source > Taxonomies
- Type > Image
- Behaviour > Radio
- Option List > Add Images
Then go ahead and publish.
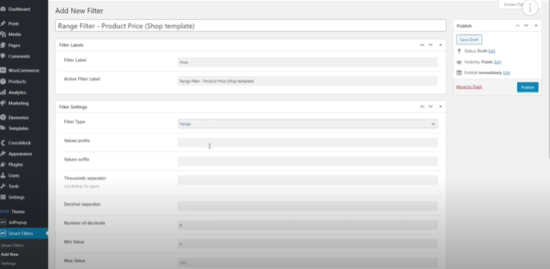
Step 4: Add Product Price Filter
Again, Smart Filters > Add New Filter. This is how you would assign the Product Price Range Filter in the title: Range Filter- Product Price (Shop Template).
- Filter label> Price
- Active Filter label > Product Price (Shop Template)
- Filter Type> Range
- Value Prefix > Currency Symbol
- Value suffix > .00
- Decimal Separator > . (dot)
- Min value > leave empty
- Max value > Enter the price of your product
- Step> Any number
- Get min/max dynamically > WooCommerce minimum/maximum prices
- Query Settings > type this meta field name (_price) and publish.
Now it’s time to apply the widgets to your filter…
Go to Crocoblock on your Dashboard menu > Woo Page Builder> Select the page where you would like to apply the widget. For example, Shop Page. Once you’re there, start working with the left side of the page.
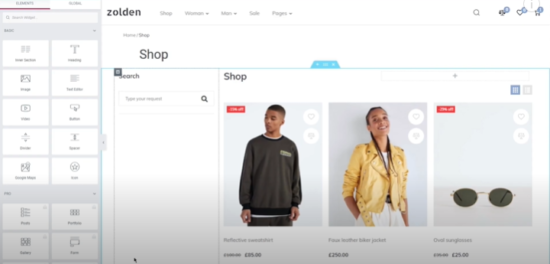
Search for the checkboxes filter in the search bar. When it appears drag the widget to your right under the Shop Title. In the content tab on the left you will see a select filter option, now type the name of the filter you created before, which is the checkboxes filter type. Whatever filter you choose, always make sure you select the WooCommerce Archive. Lastly, switch on the Show Filter option. Then you will be able to move on to style the widget as you desire. Don’t forget to save all your settings once you’re done.