Introduction
Email Marketing is no longer an optional extra for businesses, it is a priority and must be integrated into your marketing strategy. A strong email marketing strategy will allow you to connect with your target audience and increase sales. However, it is important that you create a solid email marketing campaign, using effective tools. This is why we have decided to write this guide on Constant Contact, an email marketing software created for individuals and businesses who are interested in growing their audience and increasing their sales intelligently.
The Solution
Step 1: Let’s start with Setting up Your Account

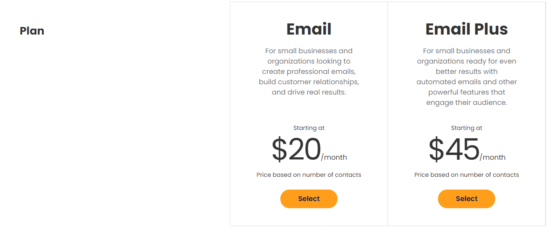
The first thing you need to do before you can set up any email campaigns is create an account. You can do this by completing a form with your most basic information. You will also be required to choose a plan. There are two basic plans you can choose from. Whichever you decide on, you will get your first month free.
Once you have selected a plan and registered successfully, it’s time to move on to verify your account. Check your inbox for an email from Constant Contact. If you don’t see an email, you can resend or try another.

Once you have completed verification. It is time to move onto Step 2
Step 2: Add Your Contacts
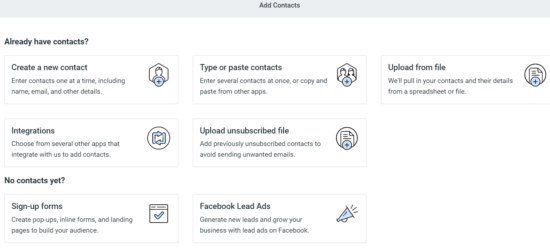
To successfully build your email database in Constant Contact, you will need to import your contacts onto the tool. Thankfully, with this tool, there are several ways you can do this, which includes a spreadsheet or file, business software, email provider, email marketing platform, ecommerce platform and event marketing platform. If you don’t have an existing contact list, you don’t have to worry. Constant Contact has the tools you need to build your database. Once your contacts are imported, you can use our segmentation and automation tools to send targeted emails to the right contacts at the right time!
Step 3: Creating Your Email
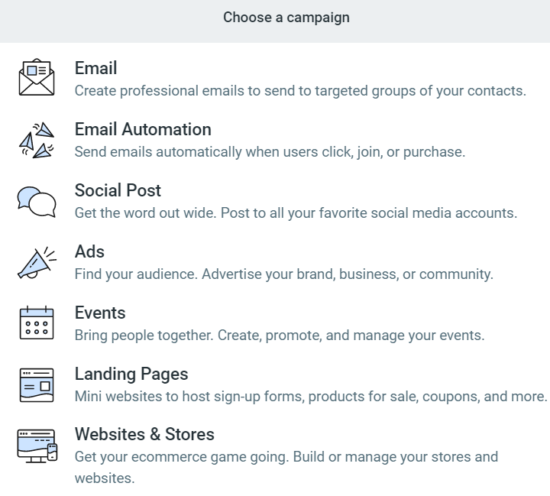
Next, you can move on to adding your custom campaign. In the dashboard click on Create. The screen above will then open up for you. To create an email campaign, click on the Email option. You will then need to select a template or build one from scratch. If you’re new to this type of software, we recommend using a template that is already structured, such as the options below.

These templates will provide you with a great structure and all you will need to do is replace the content in the template with your own. The same goes for any images or logos etc.
Get ready to do more business with 60 days of free email marketing.
Constant Contact has a drag and drop functionality. That allows you to easily move around text blocks, images etc.
Step 4: Customising Your Email
Once you have chosen your template, you will be taken to a new interface, where you will be able to customise your template according to your preferences. It will look like this:
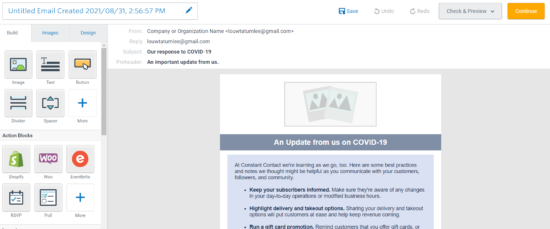
Firstly, you will need to give your email campaign a name, in the first field. Then, you will be able to add images, texts, buttons, dividers, spaces and action blocks. You will also be able to choose a layout, if you’re not happy with the current one. You will be able to add all your images and play around with the design elements too.
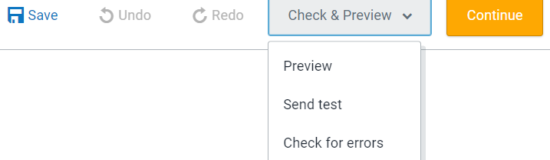
Once you have customised your email template to suit your campaign go ahead and click on Save. You will then be able to preview your mail, send you a test and check for errors. Then click on Continue.
Step 5: Get Ready to Send You Email
After you click on Continue, you will reach the last step of your campaign, sending your email.
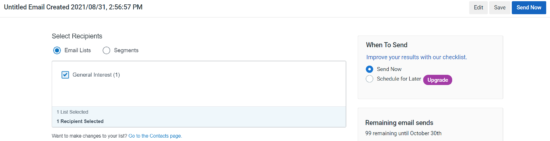
You will be able to select the email list, if you have added one. You will also be able to segment your email into different segments, in case you intend to target different audiences. You will also be able to schedule your email, if you have chosen the more advanced plan. With the basic plan you will only be able to save your email for later or send it immediately. If you’re on the upgraded plan you will be able to A/B your email campaign.
Step 6: Review Your Email Reporting
Once you send your email, you’ll want to check the reporting to see how it’s performing. Use this information to find out how engaged your contacts are and what you can do to
improve future campaigns.
Step 7: Setup a Welcome Email
Set up an automatic Welcome Email. First impressions are important – don’t forget to set up a Welcome Email that automatically sends to new contacts when they join your list through one of your sign-up forms! In fact, it is always a great idea to be proactive, we suggest creating this email first and then creating your campaign. You can then save it for later and setup triggers, so that it is sent off once a new subscriber enters your list.
Tips for creating a successful email
- Subject line: Your subject line is everything. Keep it short and sweet (4-7 words) to ensure your message gets across even when viewing on mobile
- Add a preheader: Get creative and further entice your users by adding a preheader.
- From name: Use a “From” name that your contacts will recognize. This could be your name or your business name, depending on what the purpose of the email is.
- From address: Use a “From” email address with your company’s domain (you@yourcompanyname.com).
- Logo placement: it is good practice to place your logo at the top of your email to reinforce your brand.
- Images: Don’t over do the images. Use 1-3 images per email.
- Fonts: Please shy away from using a whole lot of different fonts. Decide on 1 or 2 maximum.
- Text: Keep your content concise with 20 lines of text or even less.
- Links: always position your links strategically. Add the most important links at the top of the email, and consider using buttons instead of text links.
- Social media: Make it easy for contacts to follow you on social media by adding your social networks
Get ready to do more business with 60 days of free email marketing.