Have you seen Elementor?
Our flagship product, Layers has been acquired by the team at Elementor.
With a powerful, fast page builder, Elementor is the best way to get your site online with as little effort as possible.

The Albums post type is used to create individual albums, or collections of images. Each of these albums may then be added to an Album Category to showcase specific projects or similar subjects.
Album Categories
Categories divide your album posts into groups, disciplines or any other subsection you can think of. Multiple albums may belong to one category, separate categories, or just one big category – it is up to you. The categories will show across the top of the page, below the header image when viewing your Album page, to allow visitors to filter the view. Additionally, categories may be linked to directly to allow for showcasing specific albums as separate pages in your main menu. The following illustrates how the hierarchy works:
- Album Page = List of Album posts showing up to 5 thumbnails from the post in each row
- =Category page = List of Album posts showing up to 5 thumbnails from the post in each row, from the selected category
- ==Album post = Displays a list of images attached to the single gallery post, plus any text from the post
- ===Photo = Displays a single photo from the album in full size using a minimal/compact layout.
- ==Album post = Displays a list of images attached to the single gallery post, plus any text from the post
- =Category page = List of Album posts showing up to 5 thumbnails from the post in each row, from the selected category
To add categories, go to →
Examples of Categories might be Landscapes, Fashion, Glamour, Animals, Black & White, etc.
Creating Albums
- Click on →
- Add a Title
- Optionally add any text you wish to appear on the album post view. For best results, keep this brief and do not insert images.
- Click in the post editor sidebar.
- Click the tab, then click Select Files to browse to your images and upload them OR
- Use the EasyGram button to add images from Instagram. See How to Use EasyGram for detailed instructions.
- When complete,select Uploaded to this Post from the drop-down menu
- Click each image thumbnail to view the image details on the right.
- Edit the image Title
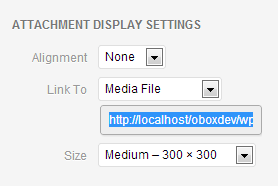
- Ensure Media File is selected in the Link To menu

- To change the order these images appear in the album, drag and drop them in the desired order. Images on the farthest right will appear at the top of the post.
- Click on the thumbnail you want to use as the album cover/ featured image and then click Set Featured Image in the lower-right.
- Choose a category under the Category box.
- Enter a number into the Order field in the Attributes box. This allows you to set the order your albums appear on the main Album Page or vategory view, with 1 being first/top and so on.
- Click Publish. This button will change to Update once a post has been published once.
My Header Background is repeating the first image
The Header background will always be your featured image. You may change the order of images in the post to keep the header and first image from being redundant. See How to Manually Order Attachments in Galleries, Portfolios and Albums for detailed help with ordering your images
Create the Albums page
The Albums Page Template displays a list of album posts, represented by the last 5 thumbnails in the order you manually specify (or in chronological order by default). The category pages are dynamically generated and do not require the creation of individual pages, unless you wish to do so for permalink reasons or to take advantage of a different page template, explained in more detail in later articles.
Do not use this template as a static homepage! Choose your homepage layout under Theme Options instead (visit the Home Page setup article for details)
- Click on on →
- Give the page a Title
- Under the Page Options panel below the post editor, select the category to show, or leave All selected to create a main Album index.
- Choose how the album posts are ordered on the page. By default, it will use the order the posts were created, or the manual order you gave them.
- Choose Post Date to order them chronologically
- Choose Post Title to order them alphabetically
- Choose Random to randomize on each page load
- Choose Comment Count to order by popularity (requires use of built-in comment functionality and considers posts with the most comments to be the most popular)
- Choose the Sort Order.
- Ascending is by Most recent (top/left) to Oldest(bottom/right) or 1-10 or A-Z
- Descending is Oldest first (top/left) or 10 – 1 or Z – A
- The remaining page options do not apply to this page template and may be skipped.
- Click if you would like the header of this page to display a specific photo, otherwise it will use the default header/header color.
- Select the Album page template from the Template drop down in the Page Attributes box on the right sidebar.
- Click Publish

Adding Lightbox Support
By default, images in your album post will just open in a new tab when clicked. This cannnot be changed easily, but you can add a lightbox to display the full image in an elegant overlay.
We do not bundle a lightbox with Photogenic to allow you to choose from the many amazing plugins out there. This post covers some plugins we have used or tested. In general, Fancybox, Responsive Lightbox and Lightbox 2 all do a fine job. Whichever plugin you choose must be able to work with the “lightbox” rel value. See the plugin documentation if you’re unsure.
Additional Tips
You may have additional images for a single album such as photos showing a different angle or detail.
Uploading Additional Images Using the Media Manager to an already published post
- Within the product post, click on the button above the post editor.
- Click Upload Files, then Select Files to browse to your images and upload them.
- Images must be uploaded directly. Selecting images already in the Media Library will not attach them to the post and they will not display!
- When complete, click each image to view the image details on the right.
- Edit the image Title
- Ensure Media File is selected in the Link To menu
- Close the Media manager (hit the X in the corner) without inserting any images into the post.
- Do not click Insert to Post
- Do not create a WordPress Gallery and insert it
Delete images from a Post
- Edit the post and click the Add Media button
- Click the Media Library tab and select Images Uploaded to this Post from the drop-down
- Click the checkmark icon in the corner of the thumbnail to unattach the image OR select the image and click the Delete Permanently link on the far right
Portfolio posts or images may be displayed on your home page or any widgetized page by using the Content Widget. Details on widget setup and options are outlined in the Configure Your Widgets article.
To quickly unattach and reattach existing images in your Media Library to a different post, check out the Unattach and Reattach Media plugin.