Have you seen Elementor?
Our flagship product, Layers has been acquired by the team at Elementor.
With a powerful, fast page builder, Elementor is the best way to get your site online with as little effort as possible.

This article covers basic use of the standard Post in WordPress. Check out the following video walkthroughs for a visual supplement to these detailed steps.
Before you add posts, it is a good idea to plan out your content structure. Posts may be divided into several topics, such as News, Lifestyle, Interviews and so on. View your theme demo to see how we use categories in your theme.Setup Categories
- Click on →
- Add a new category to serve as your main News category, then click Add New Category. For example, our demo uses "Latest News."
- Repeat to add a category named Featured. You can use the Featured category to hand-pick posts from across multiple categories to display in your widgets.
- Add a Sound and Video category to showcase those post types if you plan to use them.
- Add more categories as desired, but keep them general to make navigating your content easier.
- Use Tags in your posts to break the content down into more detailed topics if needed.

Add a Post
- Click on →
- Add a title and enter your content.
- Create an excerpt by either typing some text into the Excerpt field below the post editor.
- Click the link in the post editor sidebar to add a featured image.
- Tip: If using video Embeds (instead of oEmbed) add a featured image to encourage click-throughs to your main video post
- Add any additional content in the options panel, such as links or video
- Add some tags
- Click Publish
Related Videos
Related Posts
At the bottom of your posts, the Writer will display a row of related posts if the option is enabled in Theme Options .
These posts are determined by common tag. If you want posts in the same category to relate to one another, add the category name to the tag field in the post editor, or give posts you wish to group together across several categories a similar tag. For example, you might have posts in 3 different categories that all have to do with cats. Rather than restrict related posts to the categories those posts are in, adding the “cats” tag allows people to find common topics in your blog easier.
Excerpts
The Writer aims to give you control over your excerpts, so you have two primary methods of creating the text that appears in your post blocks if you enable Show Excerpts in Theme Options :
Insert the more tag at the point in your post where you want the excerpt to end. By default this will tack on a “read more” link a the end of the paragraph. For best results, use after your first few sentences.
Manual Excerpt:
The Excerpt field in the post editor allows you to type a completely custom bit of text that will appear in the post blocks. This option is best if you want to add introductions or summaries that are not the first few lines of the post.
If the Excerpt field is not visible on your Post Editor, click Screen Options in the upper-right and check the Excerpt box.
Customizing Posts
Fall includes several customization options in the Post Options panel located just below the Post Editor. These options allow you to control the background image or header color, title color, drop shadows, or featured videos. Below is an explanation of each option:
Header Background
This section controls how the post header appears, and provides a “book cover” for the post blocks in the home page and archives:
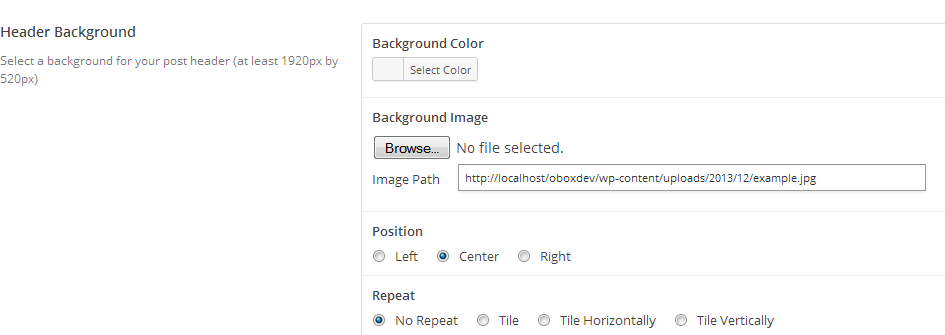
Background Color – Set the default color of the book cover/post block, and post header. If an image is used, this only affects the fade-in color before your image or video appears.
Background Image – If you choose to use an image, this will fill the background of your post blocks to create a “book cover”. It will also create a full-page intro screen to your post, therefore we recommend uploading hi-resolution images at least 1920px wide and 520 px tall. You may also use tileable images.
Position – Choose the default position for single, non-tiled images. In most cased you would choose Center. Make sure you do not leave this blank!
Repeat – Choose whether the image will appear by itself (no-repeat) or will tile in both directions (tiled) or from left to right in one line only (tile horizontally) or tile up and down in one line only (tile verically)
Post Title Color
Select the color for your post title and meta.
Enable or disable text shadows on the post titles, meta and excerpts in your post blocks.
Custom CSS
The Post Custom CSS field is a powerful tool for advanced users which allows you to control how elements in individual posts appear indepentently of one another. Use this field to designate a specific Typekit or Google Font for your post title, change the content font size, add a content area background, or whatever you can dream up! Please note that support is limited for post Custom CSS. If you need styling reference or a little help with how to start, see How to Find CSS Styles for Elements.
Some tips for using this feature are covered in the next article Post Custom CSS
Featured Video
This section allows you to add a mobile-friendly featured video to your post, which appears at the top of the post content. See How to Add Featured Videos Using the Obox Theme Options Panel and How to Use Self-Hosted Video Options for details on using this feature